Tuesday, August 25, 2009

Two Weeks in My Kitchen: August 12-24: Part 3

Some close friends asked me to make a cake for their pre-wedding party. They're from the East Coast and are getting married there in September, but wanted to have a party for their Seattle friends too. After an initial consultation, we decided to make the cake look like a wedding cake, since their actual wedding is going to be fairly casual. We also decided that it would be lemon lavender, paying homage to the fact that their engagement took place after visiting a lavender farm on Vashon Island.


I zested about 20 lemons for the cake and lemon curd filling (seen simmering here over a double boiler). Then I juiced those lemons for the cake and the filling. I love my old school glass reamer! Lavender infused simple syrup was brushed on the cake to help bolster the lavender flavor.


I blended the dry ingredients with lemon zest and lavender flowers that I ground in a repurposed electric grinder. I love that moment in baking when every one of my counters is covered in pans.


I frosted the cake with a wonderful French buttercream, that is stabilized by a "custard" of thickened milk. Each tier was filled with the lemon curd filling before being smoothed and finished.


The finished cake, embellished with yellow roses, dried lavender and buttercream pearls, was served with champagne before the couple celebrated with a dance. (Thanks to Matthew and Dave for these pictures.)
It was a great party!

Monday, August 24, 2009

Two Weeks in My Kitchen: August 12-24: Part 2

This week I scored over four pounds of cherry tomatoes from my sister and her husband. I thought I'd oven roast them for a sweet summer soup. Then I decided to try canning the soup, since I haven't tried that before. After searching many of my cookbooks and the wise old Internet, I gave it a shot.


I had a few more nectarines to use so I threw together a quick cobbler then peeled, sliced and froze the rest for the winter. I'm like a forward thinking bear...


Stesha's Quick Cobbler

Ingredients:
1 cup all purpose flour
1/4 cup sugar, plus 2 Tbsp for sprinkling
Pinch of salt
1 1/2 tsp. baking powder
1/2 cup whipping cream
1/2 egg (this is easiest if you break an egg into a bowl, whisk it slightly with a fork, then use half)
1/2 tsp. vanilla

3 cups fresh or frozen fruit (nectarines, mixed berries, peaches)
2 Tbsp. flour
Pinch of salt
1/3-1/2 cup sugar (depending on the sweetness of your fruit. Taste it first!)
2 Tbsp. butter in small pieces, plus more for dish

Method:
Preheat your oven to 375 degrees Fahrenheit. Butter a quart baking dish. Toss fruit with flour, salt and 1/4 cup of sugar. Once the fruit is coated, scatter pieces of butter throughout filled dish.
Once oven is to temperature, bake fruit mixture for 15 minutes or so, until it begins to bubble.
Meanwhile whisk flour, salt, baking powder and sugar in a medium bowl. In a separate small bowl, whisk together cream, egg and vanilla. Make a well in the dry ingredients and add cream mixture. Gently fold the wet ingredients into the dry ingredients until they come together. Dough will be sticky. Remove the bubbling fruit mixture from the oven. Raise the temperature to 400 degrees Fahrenheit. While oven is adjusting, top the fruit mixture with the cobbler dough by breaking off pieces and gently pressing them onto the fruit mixture. I like to leave some gaps between the pieces so that the fruit shows underneath. Sprinkle with 2 Tbsp. of sugar.
Return the cobbler to the oven and bake for 15-20 minutes, until the top is golden brown, and the juices thicken and bubble up through the "cobbles."
It's generally best (for the roof of your mouth) to let the cobbler cool for about 10 minutes before you pour cream on it and enjoy, but I like to live dangerously.

Two Weeks in My Kitchen: August 12-24: Part 1

It's been a busy couple of weeks. I've really craved light summer salads--maybe I'm just trying to get them while the getting's good?
One evening I enjoyed a light meal that included crusty sourdough toasted and topped with French feta. I broiled the feta, then glazed the whole thing with basil peach jelly. Heirloom tomatoes with sea salt and basil, garlic toast and a glass of rose completed the meal.


It seems like I've eaten more tomato salad this summer than every before. This was tomatoes tossed together with fresh mozzarella, basil, olive oil and sea salt. When the fruit is this good, you don't need to do much! My other summer stand-by is a salad of roasted zucchini tossed with a lemon vinaigrette. It can be dressed up with some toasted pecans and ricotta salata, if you're so inclined.

Wednesday, August 12, 2009

Two Weeks in my Kitchen: July 26-August 12: Part 5

I've been making a lot of jam. I was inspired by several cases of fruit from Mott's Fruit Stand in Sultan. But I'm still learning how to can. It's been a fun couple of weeks.
These are pictures of the nectarine preserve that I made on Monday. This is based on the Tangy Apricot Jam recipe from the Gourmet Cookbook, but I've tweaked it a bit.


First, I peeled the nectarines by plunging them whole into boiling water then immediately into an ice bath. The skins slip right off then. I then macerated the chopped nectarines with most of the recipe's sugar. This step takes a little longer, but it helps break down the fruit before cooking, so the jam tastes fresher. The next picture is of the macerated fruit the following day. Look at all that juice! The last photo of this set is the cooked preserve. After simmering and skimming for about 30 minutes, it takes another 25 minutes of low simmering to thicken.


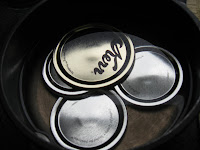
Time to fill and process. I love how the ranks of jars look as they wait for their lids. After ten minutes in the boiling water canner the cooled jars dry and seal on the counter. That "ping" they make always makes me smile.

Nectarine Preserves (based on the Tangy Apricot Jam from the Gourmet Cookbook)

Ingredients:
5 pounds firm but ripe nectarines, peeled and pitted, chopped into 1/4 inch chunks
4 1/4 cups sugar
1/3 cup freshly squeezed lemon juice
1 (1 3/4-oz.) box pectin (optional)

Special Equipment:
Seven 1/2-pint canning jars with lids and screw bands, hot water canner, tongs, canning tongs

Method:
After peeling, pitting and chopping nectarines toss them with 4 cups of sugar in a large bowl. Cover and refrigerate for at least 8 hours, or overnight.
Sterilize jars and lids and wash screw bands, according to jar manufacturer's recommendation.
Chill two plates for testing the jam.
Transfer the macerated nectarine mixture to a large pot. The sugar will not be completely dissolved. Stir in lemon juice. Bring this mixture to a boil over moderately high heat.
Stir frequently and skim off any foam that comes to the top. Simmer briskly for about 20 minutes.
Reduce the heat and continue to cook the preserves at a slow simmer. Stir the mixture frequently to avoid scorching. Begin testing jam for the desired thickness after about 25 minutes.
(To do this drop a small spoonful of jam onto a chilled plate, refrigerate for a minute, then tilt the plate. The jam should stay mounded, not run.)
If using pectin, whisk with remaining 1/4 cup of sugar in a small bowl. When jam is ready, whisk the pectin/sugar mixture into the hot jam. Return the mixture to a high simmer and cook preserves for another minute or so. (You don't need to use pectin for the nectarines, as they should have enough natural pectin to set the jam. But if they are particularly ripe, or you're worried about it setting it can help. It does cloud the flavor of the fruit very slightly.)
Drain your sterilized jars upside down on a clean kitchen towel for about a minute. Turn them over to receive the jam. Using a funnel, ladle the hot jam into each jar. It's best if the jam comes withing about a 1/4 inch of the top of the jar. I gently tap each jar on the counter to help settle the jam and remove any air pockets.
This amount of nectarines usually makes seven 1/2-pints of jam, but if you have a last jar that is half full, seal it and let it cool. Don't process it in the canner. You can use this jam first, but you'll need to refrigerate it once it is cool.
Using a clean, damp towel wipe the tops of the jars. Seal jars with lids and screw bands. Add to hot water canner and bring to boil. Process the jam for 10 minutes in the boiling water. Remove from the canner and let the jam cool.
As the seals set on the jars, you should hear a "ping." If you don't hear this sound, don't worry. It's most important that the lids are concave on the jars. Another easy way to tell that the seal is set is this: once the jars are processed and cooled remove the screw band from one and see if you can get the lid off. It should be difficult to do this. If you are able to, the seal didn't set. Don't panic if this is the case. You can just refrigerate the jam and use it first. Jarred but unprocessed jam can last in your refrigerator for several months.

This jam tastes best if you let it sit at least a day for the flavors to develop. I usually squirrel away a couple of jars for the dead of winter and when the rain starts to get to me, I pop one open and remember the summer sunshine.

Tuesday, August 11, 2009

Two Weeks in my Kitchen: July 26-August 12: Part 4

I was heading to a party on August 2 and wanted to bring a dessert. I remembered a delicious tart that I had had with apricots and frangipane (an almond custard). I tried to replicate it, with mixed results. Ah, well. Testing and tasting recipes is a tough job, but someone's got to do it.


I managed to pick about a pound of blackberries from my back garden before the landscapers tore them out. I added a little lemon and basil, seeded the mixture, and ended up with just less than a half of a pint of jam.

Two Weeks in my Kitchen: July 26-August 12: Part 3

I was meeting some folks for lunch on July 30 and wanted to bring a treat. I heard through the grapevine that chocolate was the way to go.


There's really nothing like the Pure Chocolate Chunk Cookies from Fran Bigelow's Pure Chocolate cookbook. They have about a pound and a half of chocolate in one batch!

Two Weeks in my Kitchen: July 26-August 12: Part 2

Scones need jam. And it's the height of summer, so it's jam making time.


Here are some pictures of the apricot jam that I made.
I experimented with two recipes--I made the Tangy Apricot Jam from the Gourmet Cookbook (love it!) and a sweeter version from Alice Waters' The Art of Simple Food (another favorite, despite the weird organization). The tangy jam recipe included pectin, while the sweeter version didn't. They were both delicious, with the tangy version tasting just sweet/tart enough to remind me of biting into the whole fruit. More on the jam recipes in a bit.

Two Weeks in my Kitchen: July 26-August 12: Part 1

I cook a lot. No, really. And I usually take pictures, but I don't always upload them. I thought I'd try uploading them two weeks at a time. So here is part of one of the last two weeks of cooking in my kitchen. Funnily enough, these pictures don't include meals that I've made for my myself.


These are cheddar scallion and maple oat scones that I made for a friend on July 26.

the perfect balance